With the AR15 market growing by the day, building is becoming a popular option rather than buying. After owning an off-the-shelf AR15, carrying one in in its civilian or military variant for work, or just doing a bunch of research salivating over parts, people often go on to build their rifles from the ground up.
My history with the The AR15 pattern rifle spans from my experience with the M16A2 at Parris Island, followed by the M16A4 my first few years in the infantry, and concluding with the M4 carbine I carried in Afghanistan and have as my current TO weapon. I've also had the opportunity to fire the H&K M27 IAR on a familiarization range. On the civilian side, the first AR I built was on a somewhat tight budget, and ended up getting sold in favor of the new one I built upon returning home from overseas.
Out with the old
 |
| My first AR15 build, now long gone |
 |
| In with the new |
Build or Buy?
The first thing you should probably keep in mind is whether you want to build or buy an AR15. If you have no experience with the gun, I would recommend buying something off the shelf, and going from there. The reason I sold my first build was because it really wasn't set up exactly how I wanted it at the end of the day. After owning and shooting my civilian rifle for a while, and then having to actually eat, sleep, and live with the M4 carbine overseas, I was able to narrow down more what I wanted. It is not expensive to buy a good off-the-shelf rifle and shoot it for a while. Once you decide what you don't like, sell it and build from the ground up. The big misconception is that building will save you a lot of money. This is not true, with one caveat: If you buy off the shelf, and keep adding things to make it "perfect" it will cost more than just going from the ground up. To date, I know of no rifle that comes off the shelf as I would want it set up for myself.
If you do decide to go the buy and try route, one cheap, well liked, reliable off the shelf rifle is the Smith and Wesson M&P15 Sport. This entry-level AR15 can be found for under $700 many places, and not only has a solid reputation, but has Smith and Wesson backing that reputation. Even a Colt LE6920, the non-select fire version of the military M4 can be had close to $1,000 if you shop around.
So you've decided to go ahead and build...
When building a rifle, there are a few important things to take into consideration:
1. You don't need to break the bank and spend $2000+ on an AR15 to have something that is functional and reliable, or even perfect for you.
2. Weight should be a key consideration, even if you are not planning on carrying the rifle around with you, competing or even just spending a long day shooting a heavy or poorly balanced rifle will get tiring
3. Ergonomics for you (the shooter) should be considered
4. The use of quality parts ensures you will not have compatibility issues
Without further ado, my rifle, and how it is set-up.
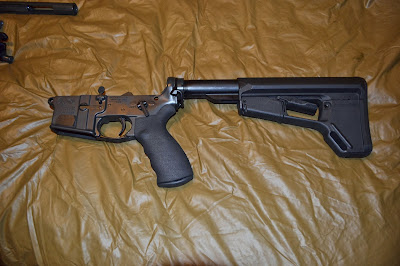
The "rifle" as far as the law is concerned is the lower receiver. Unfortunately, living in Massachusetts I faced being bound by the assault weapons ban and being limited as to what features I could have on my gun had I not paid a premium for a "pre-ban" receiver. Initially I had a fixed stock and a new receiver, but teaching shooting classes makes the adjust-ability of a stock invaluable, so I ended up buying a pre-ban Colt lower off of a friend: The stock trigger was very nice, so I opted to keep it. The lower has a mil-spec receiver extension with standard carbine spring and buffer. A Magpul ASAP single point sling mount is on the back, as well as a Magpul ACS-L stock. The ACS-L stock is a little wider for better cheek weld, has a storage compartment, and also just looks cool. I used an Ergo grip as they include a cap for battery storage, and also a built up back-strap that lines your hand up better with the trigger. The expanded trigger guard makes it easier to jam a gloved finger in the trigger guard, though admittedly probably isn't necessary.
You may have also noticed that short throw safety. Noveske and Magpul teamed up to bring a cheap short throw (60 degree) safety to market. Believe it or not the shorter throw of this safety actually makes it significantly easier flip the safety on and off when bringing the rifle up. All my AR pattern rifles going forward will have one, to include the AR10 and my fiances AR15.
Moving on to the upper receiver, weight savings was the name of the game. The upper receiver and bolt carrier group are made by Spikes Tactical. As long as they are in spec (and Spikes is known for making good quality parts) the upper and bolt carrier group should be good to go. With the bolt carrier group it is important to look for a properly staked gas key, which the Spikes is. The rifle is charged with a Bravo Company Manufacturing "Gunfighter" charging handle. The larger lever on these handles make them much easier to actuate by pulling back on only one side. This is one item that once you use it once, you will never want to manipulate a rifle without one.
 |
| Rifle broken down into components |
I went with Daniel Defense for the barrel and rail system. Daniel Defense is known for their cold hammer forged barrels, and this gun gets a 5.56mm 14.5 inch 1:7 light profile barrel with a mid-length gas system, and taper pinned low profile gas block. The mid length gas systems tend to run a little less harshly, and the taper pinning method of attaching the gas block (from the factory) is known to the the most durable way of affixing the gas block. Screws and clamps can conceivably come loose, a taper pin properly installed is not going to go anywhere. The heavier government profile barrels are not necessary if the end user is not going to be mounting a grenade launcher, or firing at the rapid (see fully automatic) rate of fire. This is a great opportunity to cut weight from the forward portion of the rifle. 1:7 twist, or 1 full revolution of the bullet every 7 inches, is one of the faster twist rates, and will stabilize heavier bullets than the older 1:9 and even 1:12 standards. The 5.56mm chamber tends to be more forgiving in tolerance than .223 chamber, and allows for the safe firing of both 5.56mm Nato and .223 Rem, where a rifle chambered in .223 should not be used to fire 5.56mm Nato.
 |
| DD Lite Rail, Gas Block, Barrel |
You may have noticed I said I used a 14.5 inch barrel. It is important to note that federal law prohibits rifles from having barrels shorter than 16 inches unless proper paperwork is obtained to build a short-barreled rifle. However, after I permanently had my PWS FSC556 muzzle break blind-pinned and welded on at a local gun smith, the total barrel length is approximately 16.1 inches. This muzzle brake does a great job at taming recoil, and a decent job at keeping flash out of the shooters eyes. If I lived in a state that allowed suppressors, I would have considered going the route of a muzzle device that allowed the quick install and removal of a suppressor.
 |
| Pinned FSC556 |
Next up on the upper we have the rail system. Recently I have become a big fan of the free float tubes. They save the buyer a lot of money, and are wicked light-weight. The Daniel Defense Lite Rail (discontinued, and replaced with Lite Rail II), however, weighs about as much as many of these tubes especially once you consider that there is no need to mount mini-rail sections wherever you would like to place an accessory. The rail mounts up by pinching the barrel nut between a back plate and the rail itself using six allen-head screws. I have used ladder rail covers due to their low profile and light weight where rail sections are not in use.
 |
| Lite Rail Mount-Up |
The rail supports a vertical fore-grip that I use as a palm rest, and a Fenix PD32 flashlight in a Gear Sector mount. I had to stretch out the mount with a pry-bar to fit the slightly fatter light, but it's light, clean, and perfect for actuating with my non-firing thumb.
 |
| PD32 in Gearsector Mount |
Atop the rifle sits a set of Knights Armament Company micro back up sights. The rear sight is adjustable for windage and elevation. The front sight has a slightly smaller post and can be easily adjusted without tools. These sights are small, steel, and look clean. I mainly went with them for the ability to adjust for windage and elevation, and honestly because they are small and look sleek. They can be folded and deployed without actuating any buttons, which I really like.
 |
| Sight-post is easily adjusted without tools for zeroing |
 |
| The shaf can be twisted for elevation, the knob for windage |
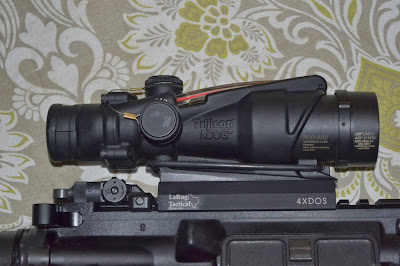
The optic which sits atop the rifle is a Trijicon TA31RCO Acog in a Larue Tactical QD mount. This lightweight, robust optic is the optic of choice for the Army and Marine Corps and is virtually indestructible. It draws it's illumination from ambient light through a fiber-optic on top, and also has a tritium lamp for illumination at night. Even without illumination it is still fully functional and has crystal clear glass. It is a fixed power 4X magnification optic. There are plenty of articles out there about it, but bottom line is I got a great deal on it so I jumped on it.
 |
| TA31RCO |
I mentioned earlier that lightweight is the name of the game. Unloaded this rifle weighs about 7.5lbs. It is noticeably lighter than my issued rifle, and and the free floated barrel from Daniel Defense makes it plenty accurate. To date I have somewhere between 2500-3000 rounds through this particular rifle, and the only issues I have had have been ammunition related.
This rifle gets used for teaching, training, and currently home defense. The home defense role may be relegated to the Tavor that I am expecting in any day now. I hope you found this blog post useful in considering how you want to build and setup your own AR15s!


Great overview! Thanks for sharing your insights and thought processes.
ReplyDelete